
This is How You Create Your Print Data Correctly
To ensure that your order is executed as efficiently as possible, we ask that you use the following information as a guide. You can create professional print files that meet our requirements with graphics programs such as Adobe Illustrator, InDesign or ArtPro.Summary of important informations to create your file


Structure of the label
Depending on the design of your label and the finishings that you require each label is structured in the following way. Please note: we have included all layers that might be needed. The elements that are a standard part of each label are marked in the blue color.
Die cut
Digital Varnish
Hotfoil / Digital Coldfoil
Digital print (CMYK)
Self-Adhesive Label / Material
Carrying material
Still not sure?
Book Artwork Service Ticket
We'll take care of your files! With our artwork services, you can choose between our Smart (from $30 USD) or Professional (from $65 USD) correction packages, depending on the scope of your project. What do you need to do? Select a correction package and upload your print data. We'll take care of the rest! Our graphics team will check and correct your print data. You will receive a report detailing the errors and corrections made for your review. Go to the artwork services now.
Take the guesswork out of label printing. Our Basic Smart Artwork service provides step-by-step technical setup and file preparation support so your artwork meets professional print standards .
Take your labels to the next level with advanced artwork setup that includes technical configuration for premium finishing options like hot foil stamping and embossing.
A tool at your disposal
Artwork Assistant
Skip the back-and-forth. Our Artwork Assistant tools automatically verify your print files and generate accurate die-lines, so your order is processed faster and your labels print exactly as intended.

Step by step
Video tutorials
Learn how to get your files ready for printing with our easy tutorial videos. They'll show you all the important steps for perfect prints.
Data delivery for labels with finishing
Hot Foil Stamping
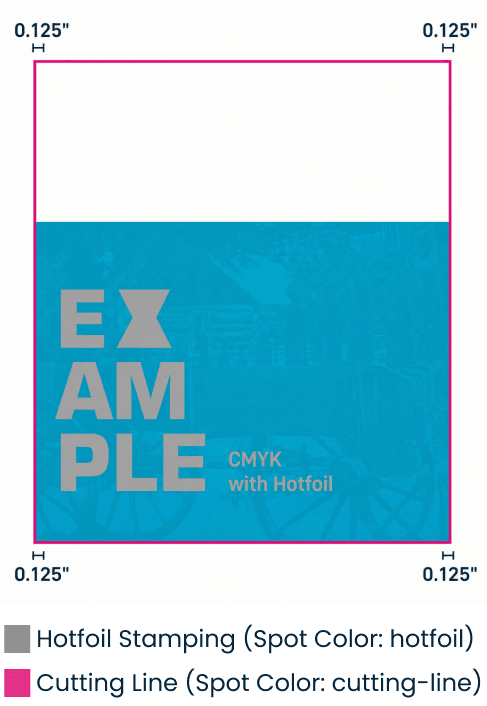
The embossing area must be created as a spot color named ‘foil’. All hot foil areas must be set to overprint and should have a minimum line thickness of 0.008 inches. Recesses within hot foil elements, such as internal cutouts or negative spaces, should be at least 0.016 inches. Please note that hot foil stamping is only possible in two dimensions; gradients are not supported. Check out our step-by-step tutorial to learn how to easily set up your hot foil artwork.
Line thickness: min 0.008 in
Recesses: min 0.016 in
Trimmed frames: min. 0.079 in
Note: Very fine details are not compatible with large, full-surface embossing. Very large areas can only be produced to a limited extent, as this may result in gaps in the foil. In this case, we will need to check your print file in detail. Please contact us if you have any questions!
Blind Embossing
Blind embossing is a classic finishing technique in label printing that creates a partial, tactile deformation of the label material. The area to be embossed must be created as a spot color. All embossed areas must be set to overprint and should comply with the minimum thickness requirements for lines and recesses.
Line thickness: min 0.016 in
Recesses: min 0.016 in
Trimmed frames: not available
Note: Trimmed frames/elements: Elements that are finished with blind embossing cannot be cut. Blind embossing is not compatible with large areas, as the blind embossing ‘sinks’ into large areas and the effect is lost.
Relief Embossing
Relief embossing is a combination of blind embossing and hot foil stamping, producing a raised hot foil effect that showcases your finished design elements at their best. As with other embossing techniques, the area to be embossed must be created as a spot color. All embossed areas must be set to overprint and should comply with the minimum thickness requirements for lines and recesses.
Line thickness: min 0.016 in
Recesses: min 0.016 in
Trimmed frames: not available
Note: Trimmed frames and elements are not possible for blind embossing, as embossed elements cannot be cut. For areas finished with hot foil only (without blind embossing), all trimmed frames must be at least 0.008 inches thick. All elements designated for embossing will also be finished with hot foil. However, relief embossing may include elements that are finished with hot foil only, without embossing. Areas finished with hot foil only will have a flat appearance.
Digital Spot Varnish
Digital spot varnish, also known as partial varnish, is a finishing technique that selectively applies varnish to specific areas of a printed label, creating a visual and tactile contrast against the surrounding surface. The area to be finished must be created as a spot color. All areas finished with spot varnish must be set to overprint and should comply with the minimum thickness requirements for lines and recesses.
Line thickness: min 0.012 in
Recesses: min 0.028 in
Trimmed frames: not available
Note: Trimmed frames: Elements that are coated with spot varnish do not adhere and cannot be cut.
Programs for Creating Data
For creating professional data, we recommend Adobe InDesign and Illustrator, for example. Adobe Illustrator and Adobe InDesign are registered trademarks owned by Adobe Systems IncorporatedPantone colors
Printing with original Pantone colors is available at an additional cost. Submit your request and we will review it and provide a quote. When Pantone colors are specified, they are simulated as closely as possible, sometimes using orange, violet, or green channels for improved accuracy. An exact 1:1 color match is not guaranteed, and metallic or neon tones cannot be simulated in digital printing. Please set all special colors as spot colors in your file and name them using the official Pantone designation. We only accept Pantone colors from the Coated (Pantone® C) and Uncoated (Pantone® U) ranges. PANTONE is a registered trademark of Pantone, LLC
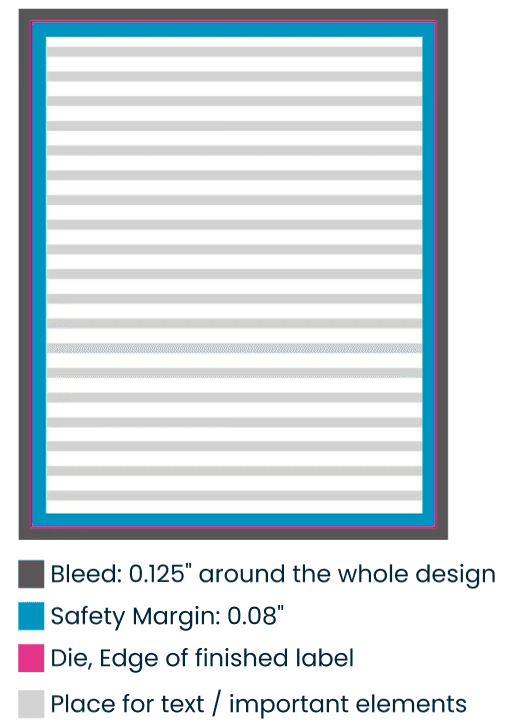
We recommend a font size of at least 7 pt and high contrast to the background. Fonts in gray or white as well as fonts that are too small can appear blurry.
Our tip:Try printing out your design at home, and place it on your product. This way you can see whether all fonts and elements are legible.